How to sync your active WooCommerce Subscribers with MailChimp
As you probably know already, email is the most effective marketing channel you have in your hands today. It provides you with the chance to have your customers’ undivided attention and reach out to them on a more personal level. Once your store starts to grow, however, ensuring your emailing lists are always up to date can become a difficult task.
To make sure you don’t miss out on valuable sales, AutomateWoo is here to bridge the gap between WooCommerce Subscriptions and MailChimp. In this quick tutorial, we’ll show you how to do this using two simple workflows.
If you do not use MailChimp for email marketing, you can also use this technique with our other newsletter integration options.
To sync your WooCommerce subscribers with MailChimp, you need to add new subscribers while removing cancelled or expired subscriptions. This way you make sure your email marketing is not being sent to those who don’t wish to receive them, and can reach new subscribers from the moment they sign up. So lets get started!
Automatically add subscribers on sign up
Step 1 Open the Workflows page and click Add Workflow.
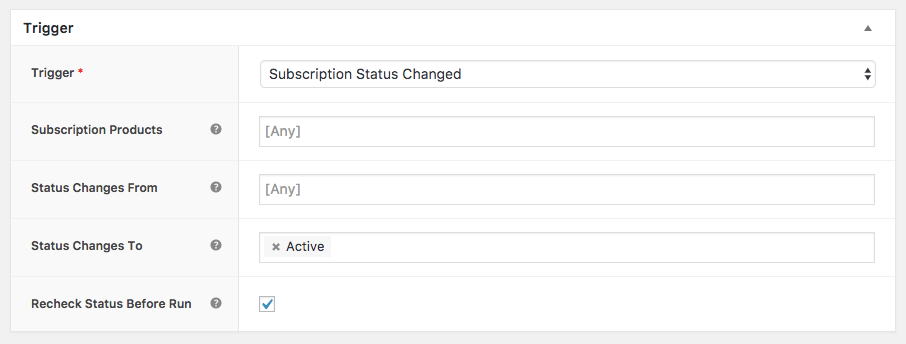
Step 2 Choose the trigger Subscription Status Changed and in the field Status Changes To choose Active.
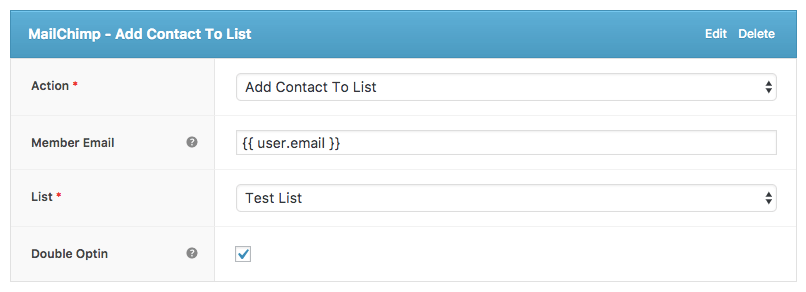
Step 3 Add the action Add Contact to List. Copy the variable {{ customer.email }} from the list of variables on the right-hand side of the page. In the List field, your MailChimp lists will automatically appear. Select which list you want to sync.
- Please note if you don’t see this action, you need to activate the MailChimp integration in the AutomateWoo settings area
Once you save this workflow, it will add every future subscription in your store to your chosen MailChimp list.
Automatically remove subscribers when their subscription expires
Step 1 Open the Workflows page and click Add Workflow.
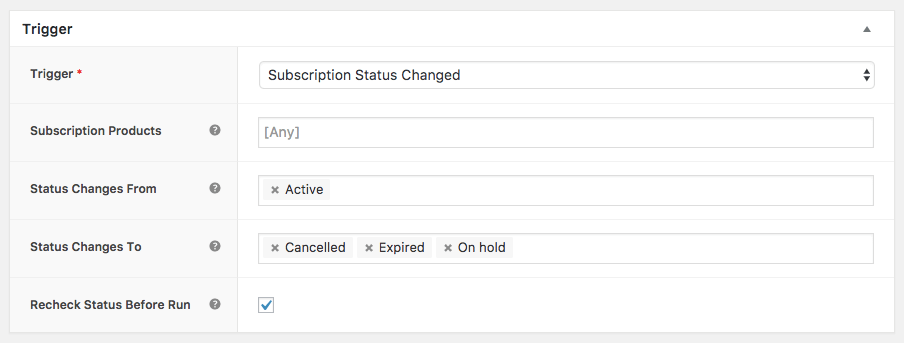
Step 2 Choose the trigger Subscription Status Changed and in the field Status Changes From, choose Active. For the Status Changes To field, you can leave this blank.
Step 3 (optional) If you wish to keep emailing customers who have cancelled their subscription but the cancellation is pending, include Pending Cancellation in the Status Changes From field and set the Status Changes To field to Cancelled, Expired and On Hold.
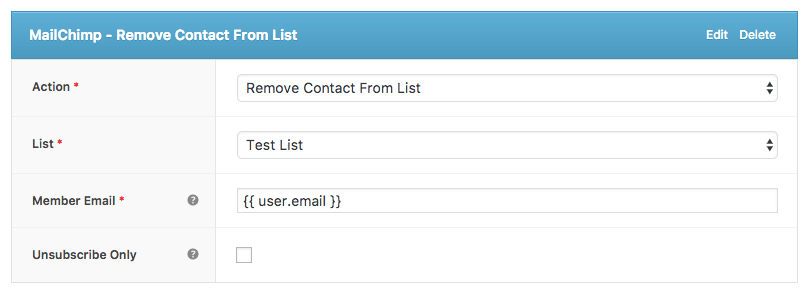
Step 4 Add the action Remove Contact from List, then select the list you wish to remove them from. Now copy the variable {{ customer.email }} into the Member Email field.
Once you save this workflow, it will remove every cancelled, expired, and on hold subscription in your store from your chosen mailing list.
Congrats! You have successfully automated the syncing of your WooCommerce subscribers with MailChimp. (MaleCrimp, KaleLimp, FailChips, VeilHymn…whatever they call themselves these days).
Bonus tip: Sync your custom fields in MailChimp
With the release of version 2.9, AutomateWoo now provides support for custom fields in MailChimp. Use the action MailChimp – Update List Contact Field in a workflow to automatically update a custom field in your mailing lists. Here’s how to update a custom field in three steps.
For this example, we will use a trigger which fires when a subscription renewal payment has been completed. With this workflow, you can sync a Next Payment Date field each month as the previous payment is completed.
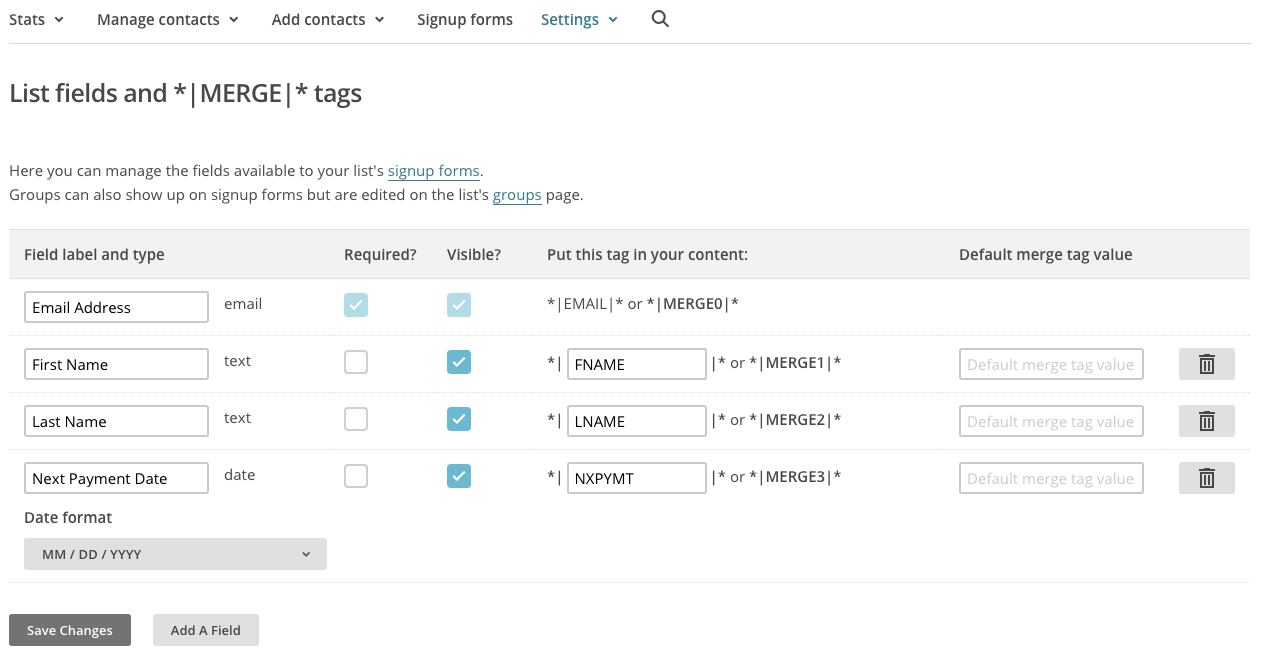
Step 1 If you haven’t created a custom field already, login to MailChimp and select a mailing list. Go into settings and find the page List fields and *|MERGE|* tags and click Add a field.
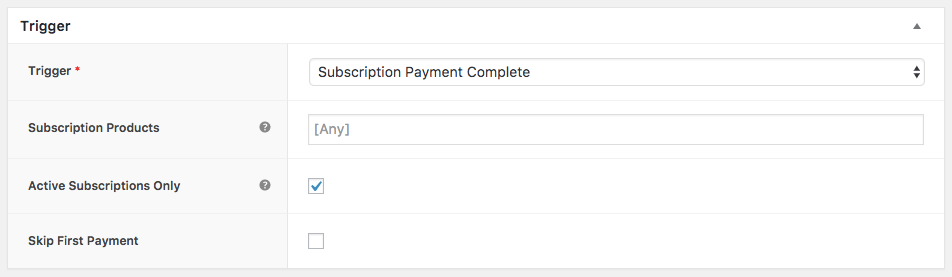
Step 2 Set the trigger to Subscription Payment Complete.
Step 3 Choose the action Update List Contact Field. Insert the variable {{ customer.email }} and select which MailChimp list you wish to choose. Choose the custom field, such as the next payment date for your subscribers. Finally, copy the relevant variable into the field value as shown below.
 What’s Next?
Now that you’re turning pro, here are more ideas you could try:
- Send follow-up emails to subscribers who have let their subscription status expire to gather feedback and encourage them to renew.
- Segment your subscriber base into lists based on the products in their subscription.
- Send your customers a welcome email a few hours after they sign up in your store.