AutomateWoo’s WooCommerce Subscription integration makes it possible to create workflows for a pre-paid subscription, where a customer pays for a certain period in advance of shipments for that period. For example, a magazine may be paid yearly, but ship a new issue each month.
This guide demonstrates how to use AutomateWoo workflows to create a pre-paid subscription.
The guide uses a 12-month magazine subscription to illustrate the workflows needed to create a pre-paid subscription; however, the same approach can be used for selling subscription boxes, meal kits, coffee, educational course content, and many other items on a pre-paid subscription.
Prerequisites
↑ Back to top- AutomateWoo version 5.4 or newer
- WooCommerce Subscriptions 2.5 or newer
- A payment method that supports modifying the payment date
- (optional) the free WooCommerce Custom Price String plugin
Pre-paid subscription product
↑ Back to topThe first step to creating a pre-paid subscription is to create a product that will be used to offer your customers the subscription.
The subscription product used to offer the subscription for purchase in your store does not need to be the same product used to provide each month’s shipment. For example, to create an annual magazine subscription, it is possible to use two different general classes of products:
- the annual subscription product; and
- each month’s edition, which would be 12 different products, one for each month
This has advantages, like being able to create separate SKUs for each month’s magazine. However, to keep this guide simpler, we will use just one product.
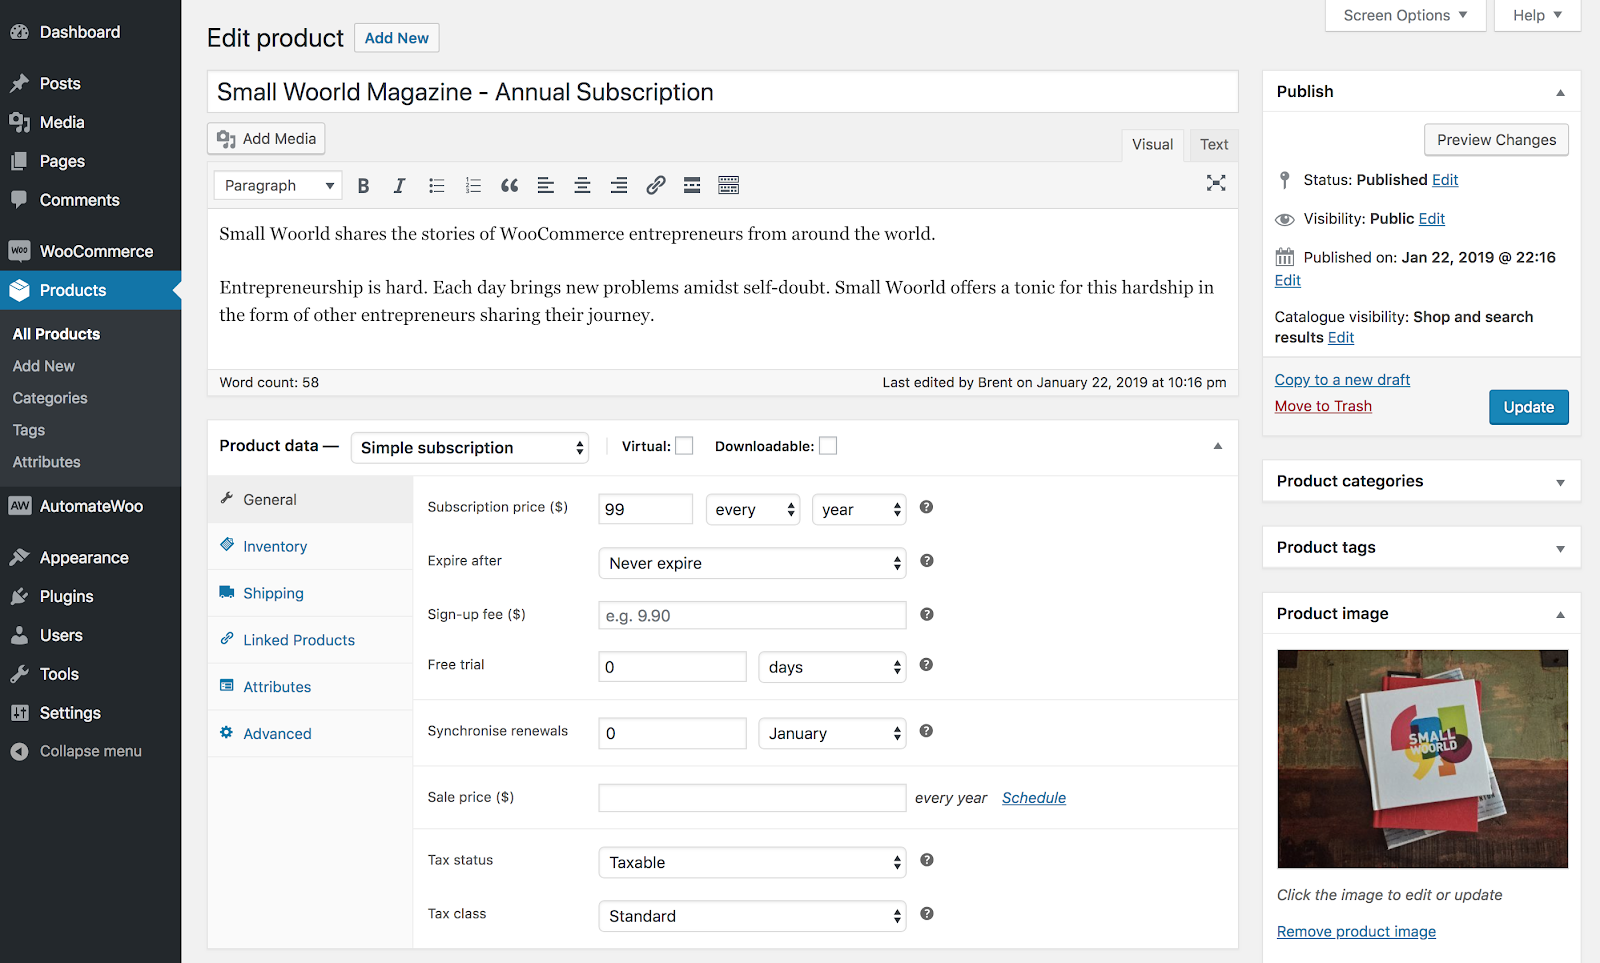
Step 1: Create the annual subscription product
↑ Back to topTo create the annual subscription product:
- Go to WooCommerce > Add Product
- Click Simple Subscription as the product type
- Set the price and billing schedule to be the pre-paid term cost, e.g. $99 / year
Step 2: Display a Custom Price String (Optional)
↑ Back to topAfter setting up the product, it will display the total pre-paid term as the price of the product on the front-end of your site.
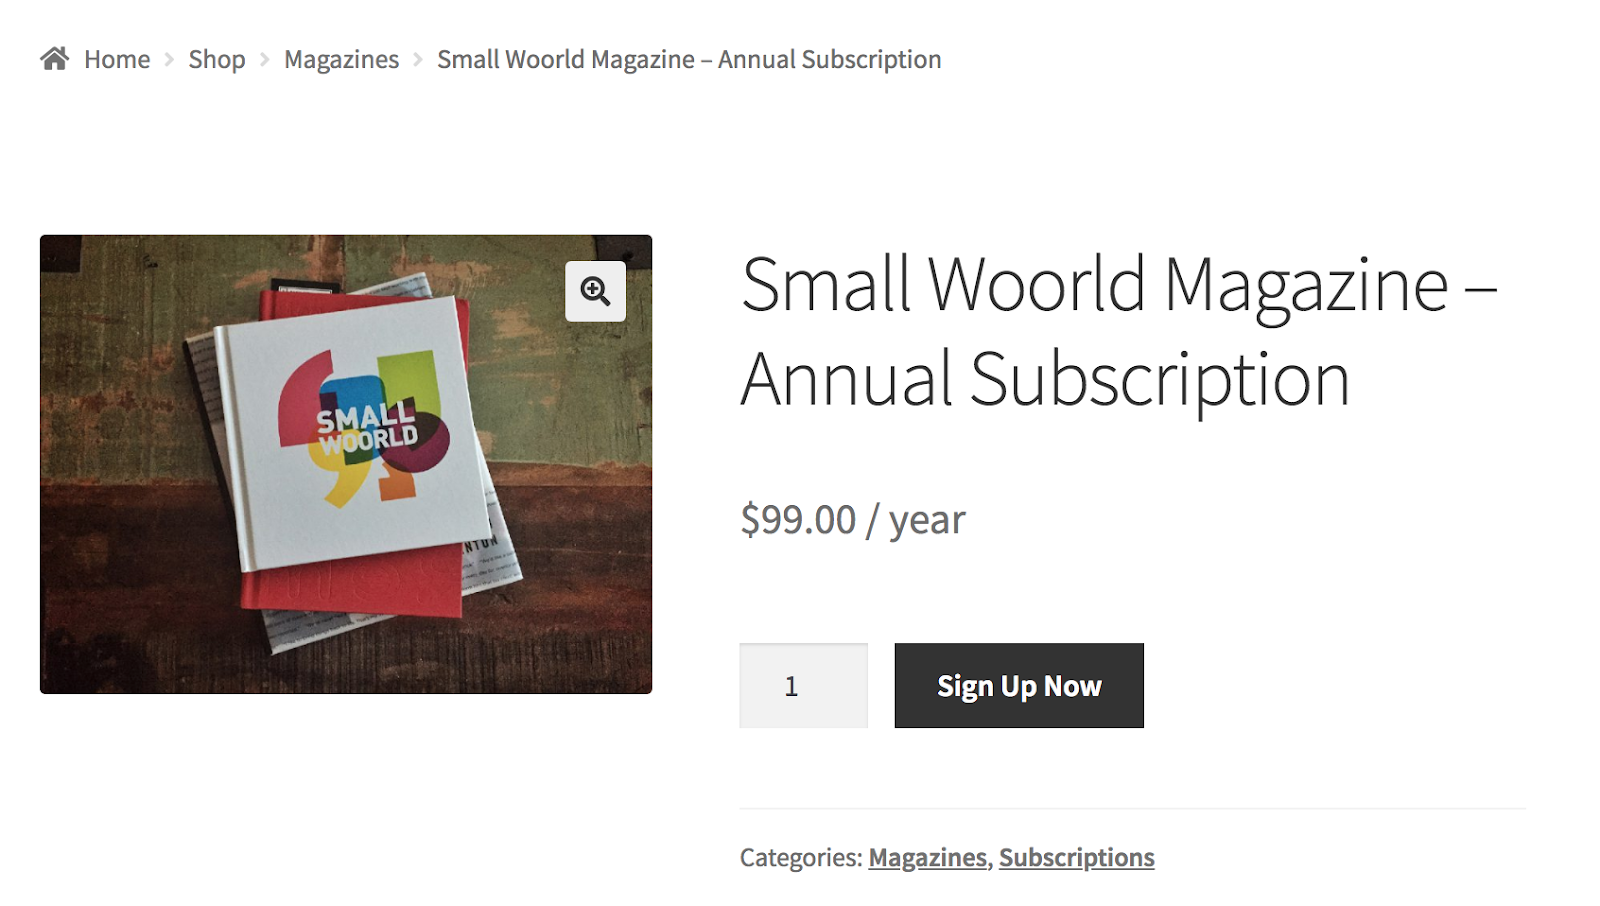
While the price displayed is technically correct, it leaves out important information – the yearly price provides 12 monthly shipments. To display this information alongside the price, use the free WooCommerce Custom Price String plugin.
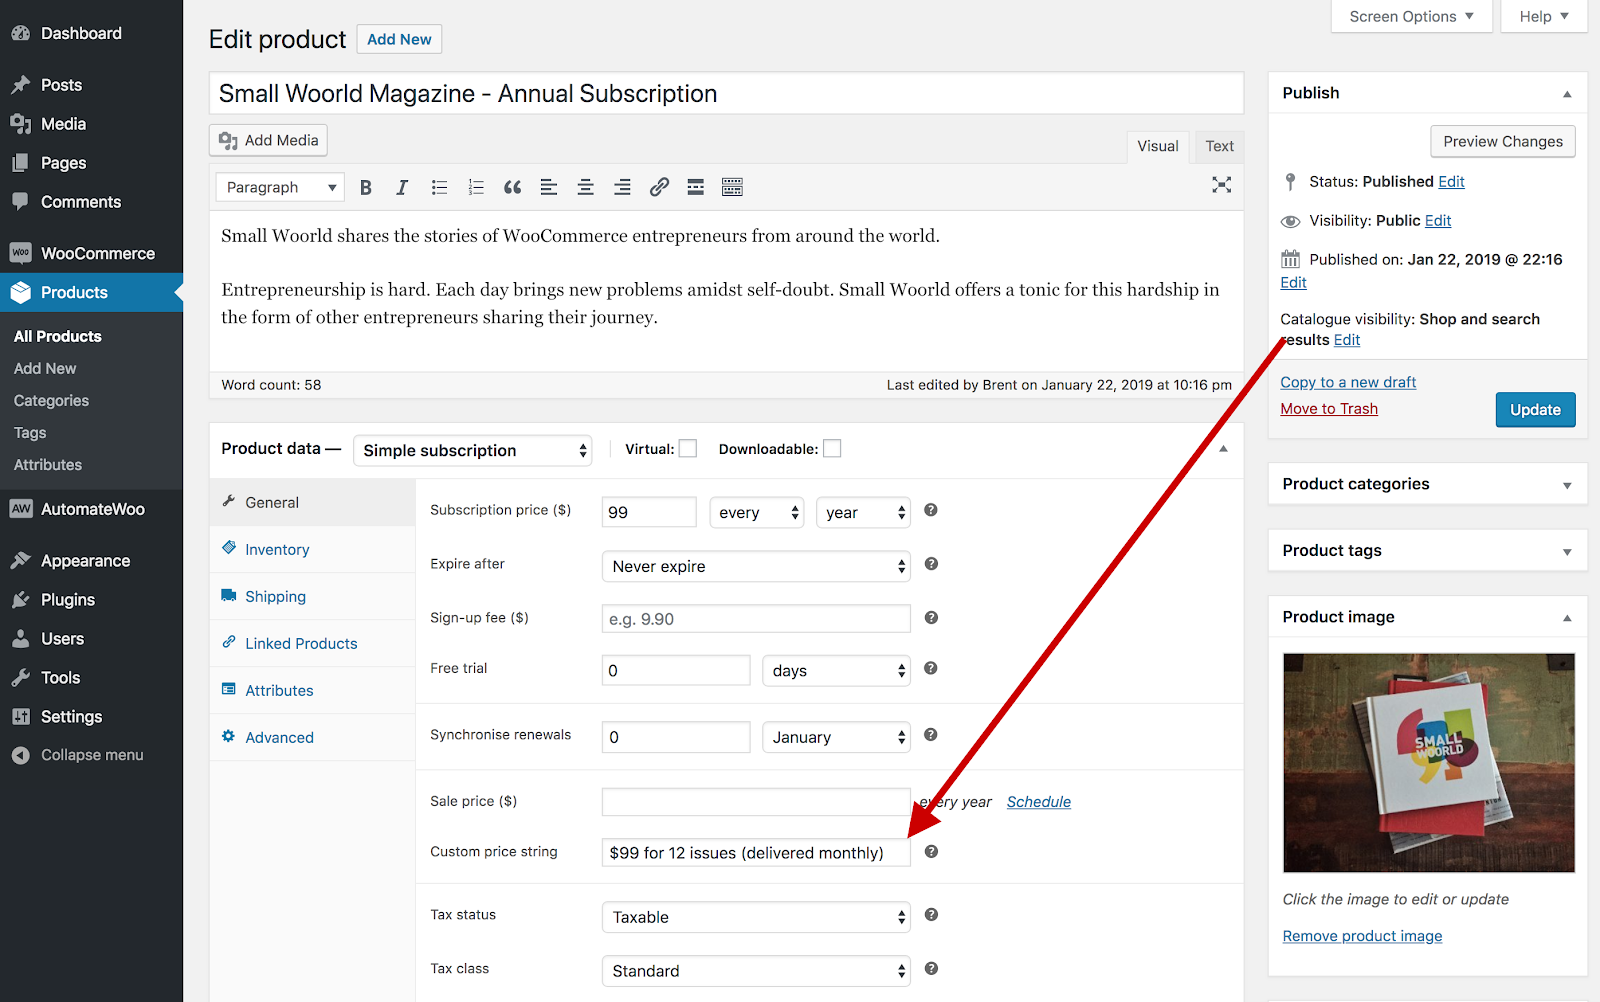
To set a custom display price with this plugin:
- Upload, install & activate the Custom Price String plugin
- Go to WooCommerce > Edit Product screen for the product
- Enter the Custom Price String
- Click Update
For best results, we recommend including all of the following information in the custom price string:
- Price
- Billing schedule
- Shipping schedule
For example, with our annual magazine product, we can use the price string:
$99 for 12 editions (delivered monthly)
Subscription lifecycle workflows
↑ Back to topNow that we have our product, we need to create workflows in AutomateWoo to set the correct price and billing schedule at each stage of the pre-paid subscription’s lifecycle.
There are 3 distinct stages for the subscription, each of which requires a workflow:
- Start of the first pre-paid term after sign-up
- Renewal of the pre-paid term with another payment after 12 months worth of shipments; and
- Resumption of the pre-paid term after the renewal payment
Workflow 1: Start the pre-paid term
↑ Back to topThe first step is to set up the subscription to make sure that:
- no renewal payments will occur during the pre-paid term and
- it will create a renewal order each month for each shipment.
To change the subscription to process free shipments requires:
- The billing schedule to change to be each month, not each year
- The product line item amount to be changed to be $0
- (optional) shipping line item amounts to be $0
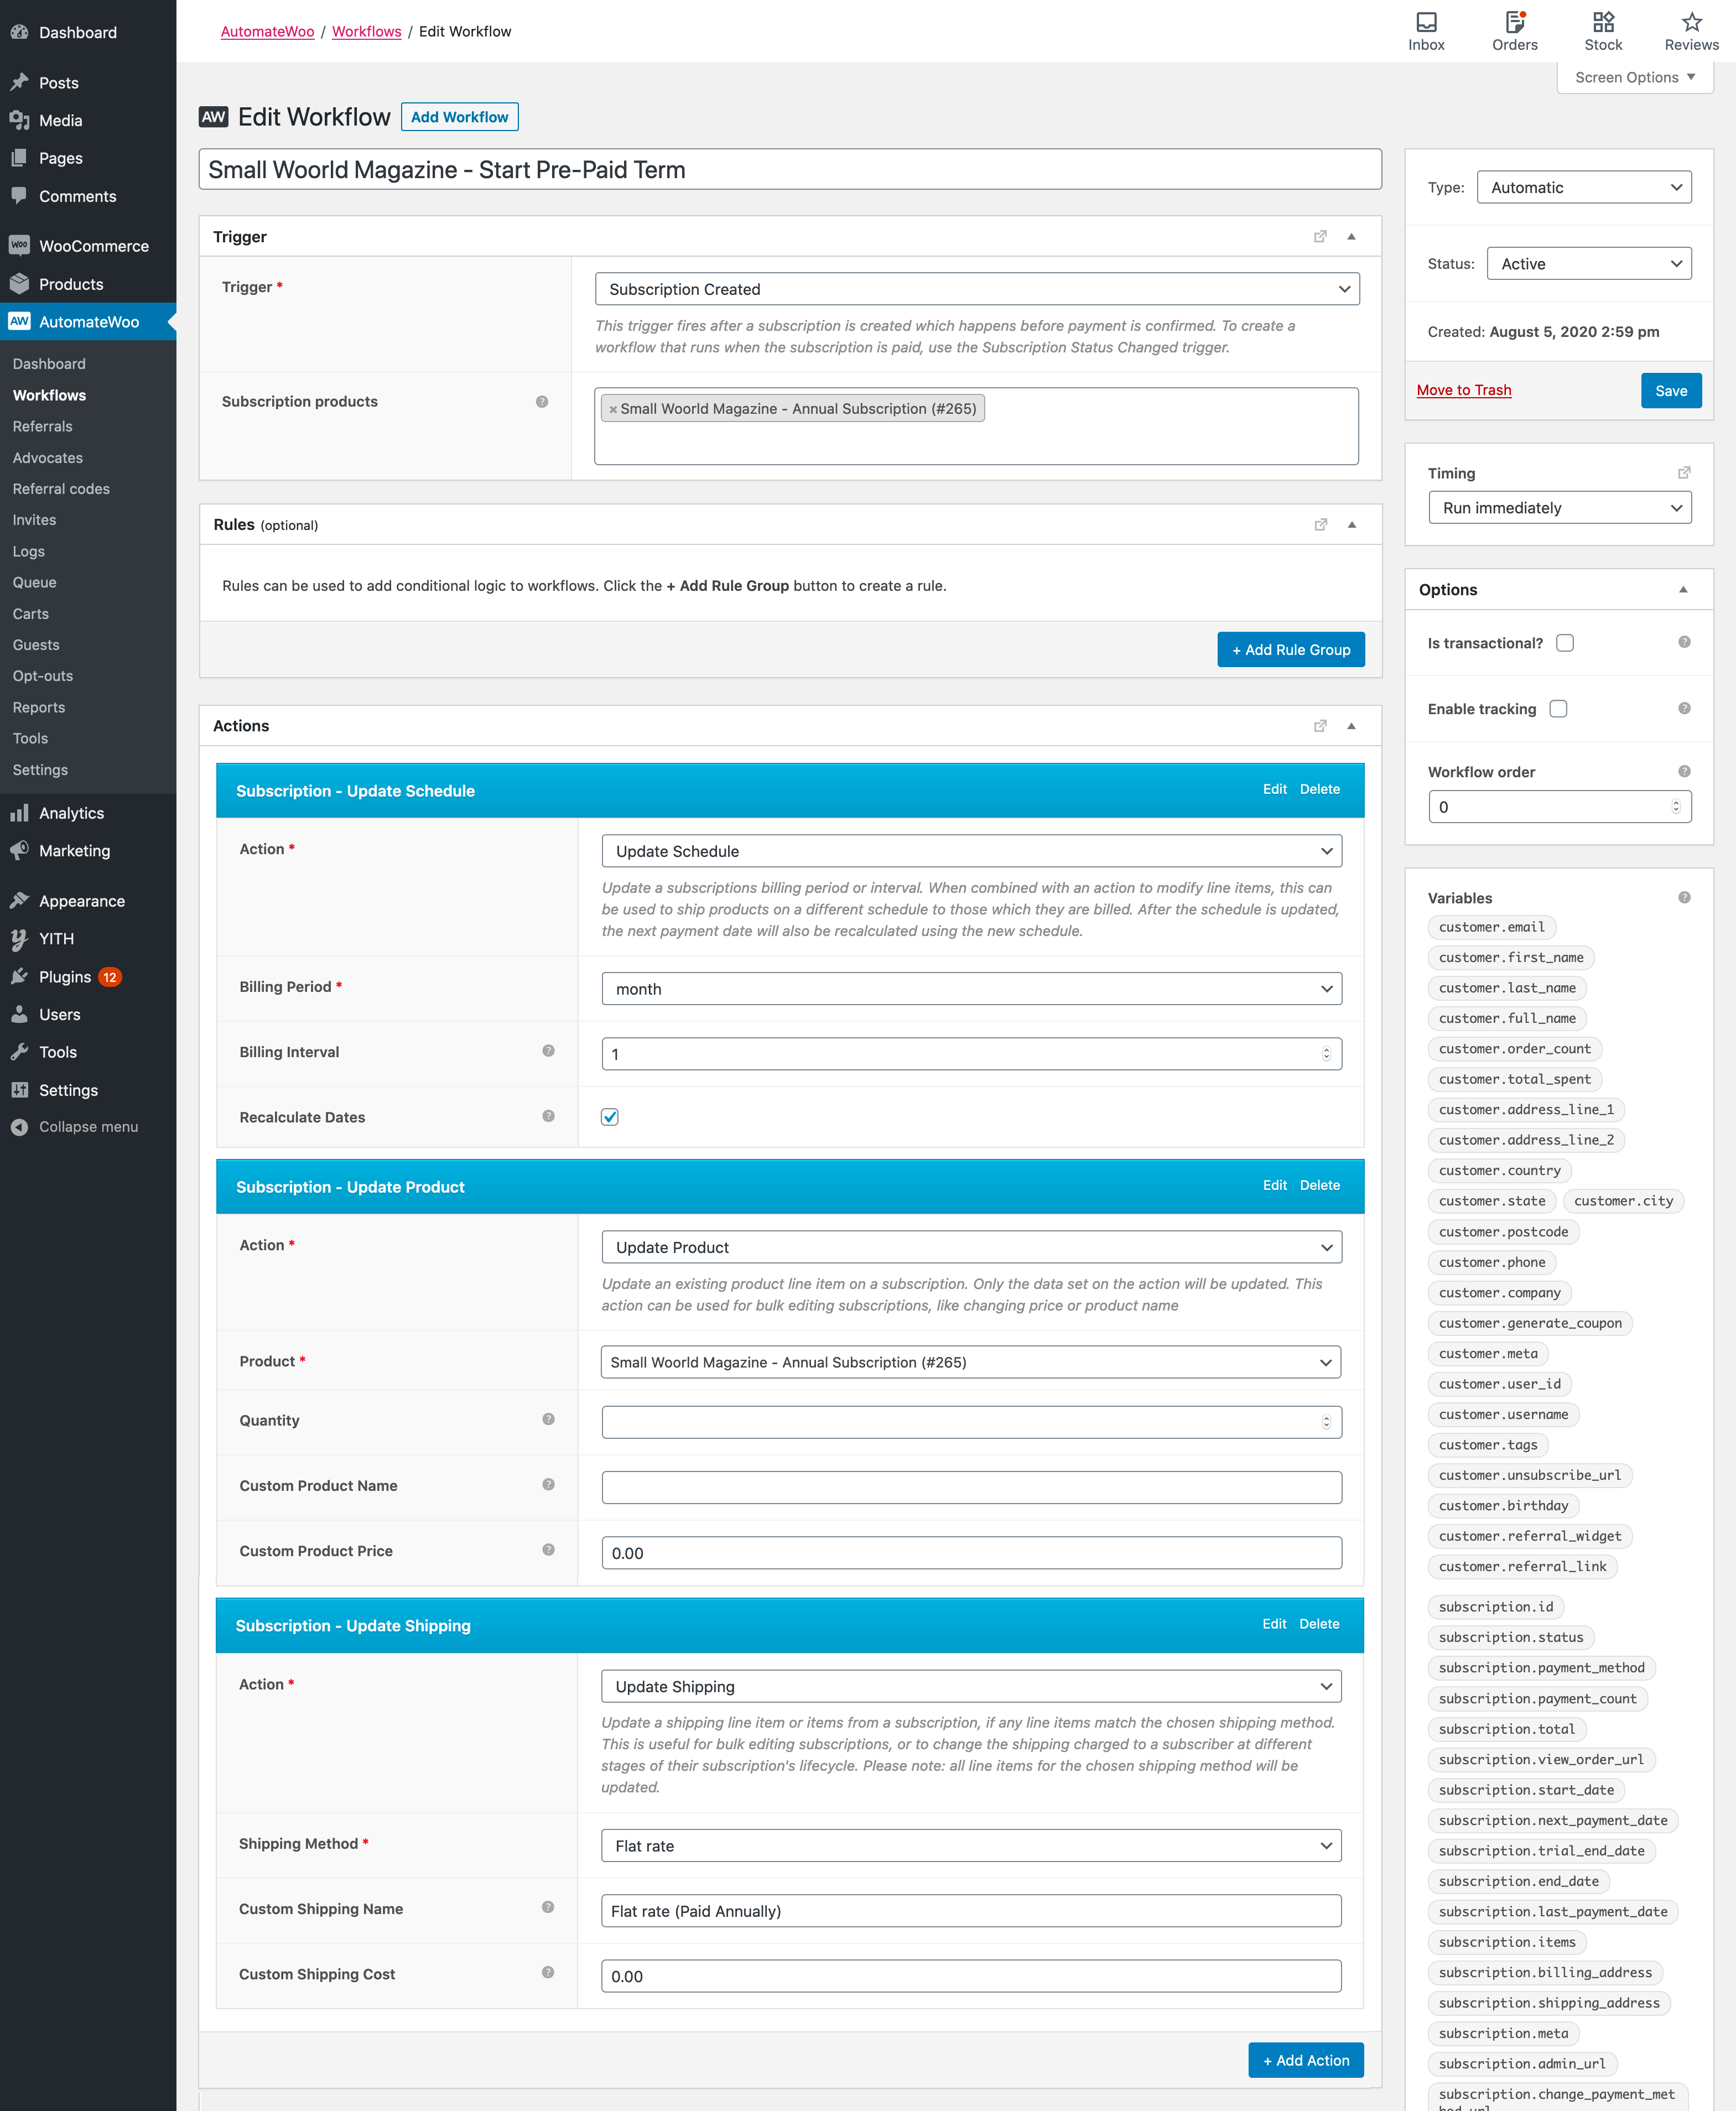
To create a workflow that achieves these requirements:
- Go to AutomateWoo > Workflows
- Click Add Workflow
- Enter a Title for the workflow, like Start Pre-Paid Term
- Select trigger: Subscription Created
- Click the Subscription products input
- Enter the name of the pre-paid subscription product created earlier
- Add action: Subscription – Update Schedule
- Enter the new Billing Period, for this example, it will be month
- Enter the new Billing Interval, for this example, it will be 1 to ship monthly
- The Recalculate Dates should be checked to make sure the next renewal date is updated to be in 1 month, not 1 year
- Add action: Subscription – Update Product
- Search for the annual subscription product
- Enter Custom Product Price of 0.00
- Add action: Subscription – Update Shipping
- Select the shipping method offered in your store
- Enter Custom Shipping Cost of 0.00
- (optional) Enter Custom Shipping Name that mentions that it is paid annually, this helps explain on the monthly invoices why it’s included, but free
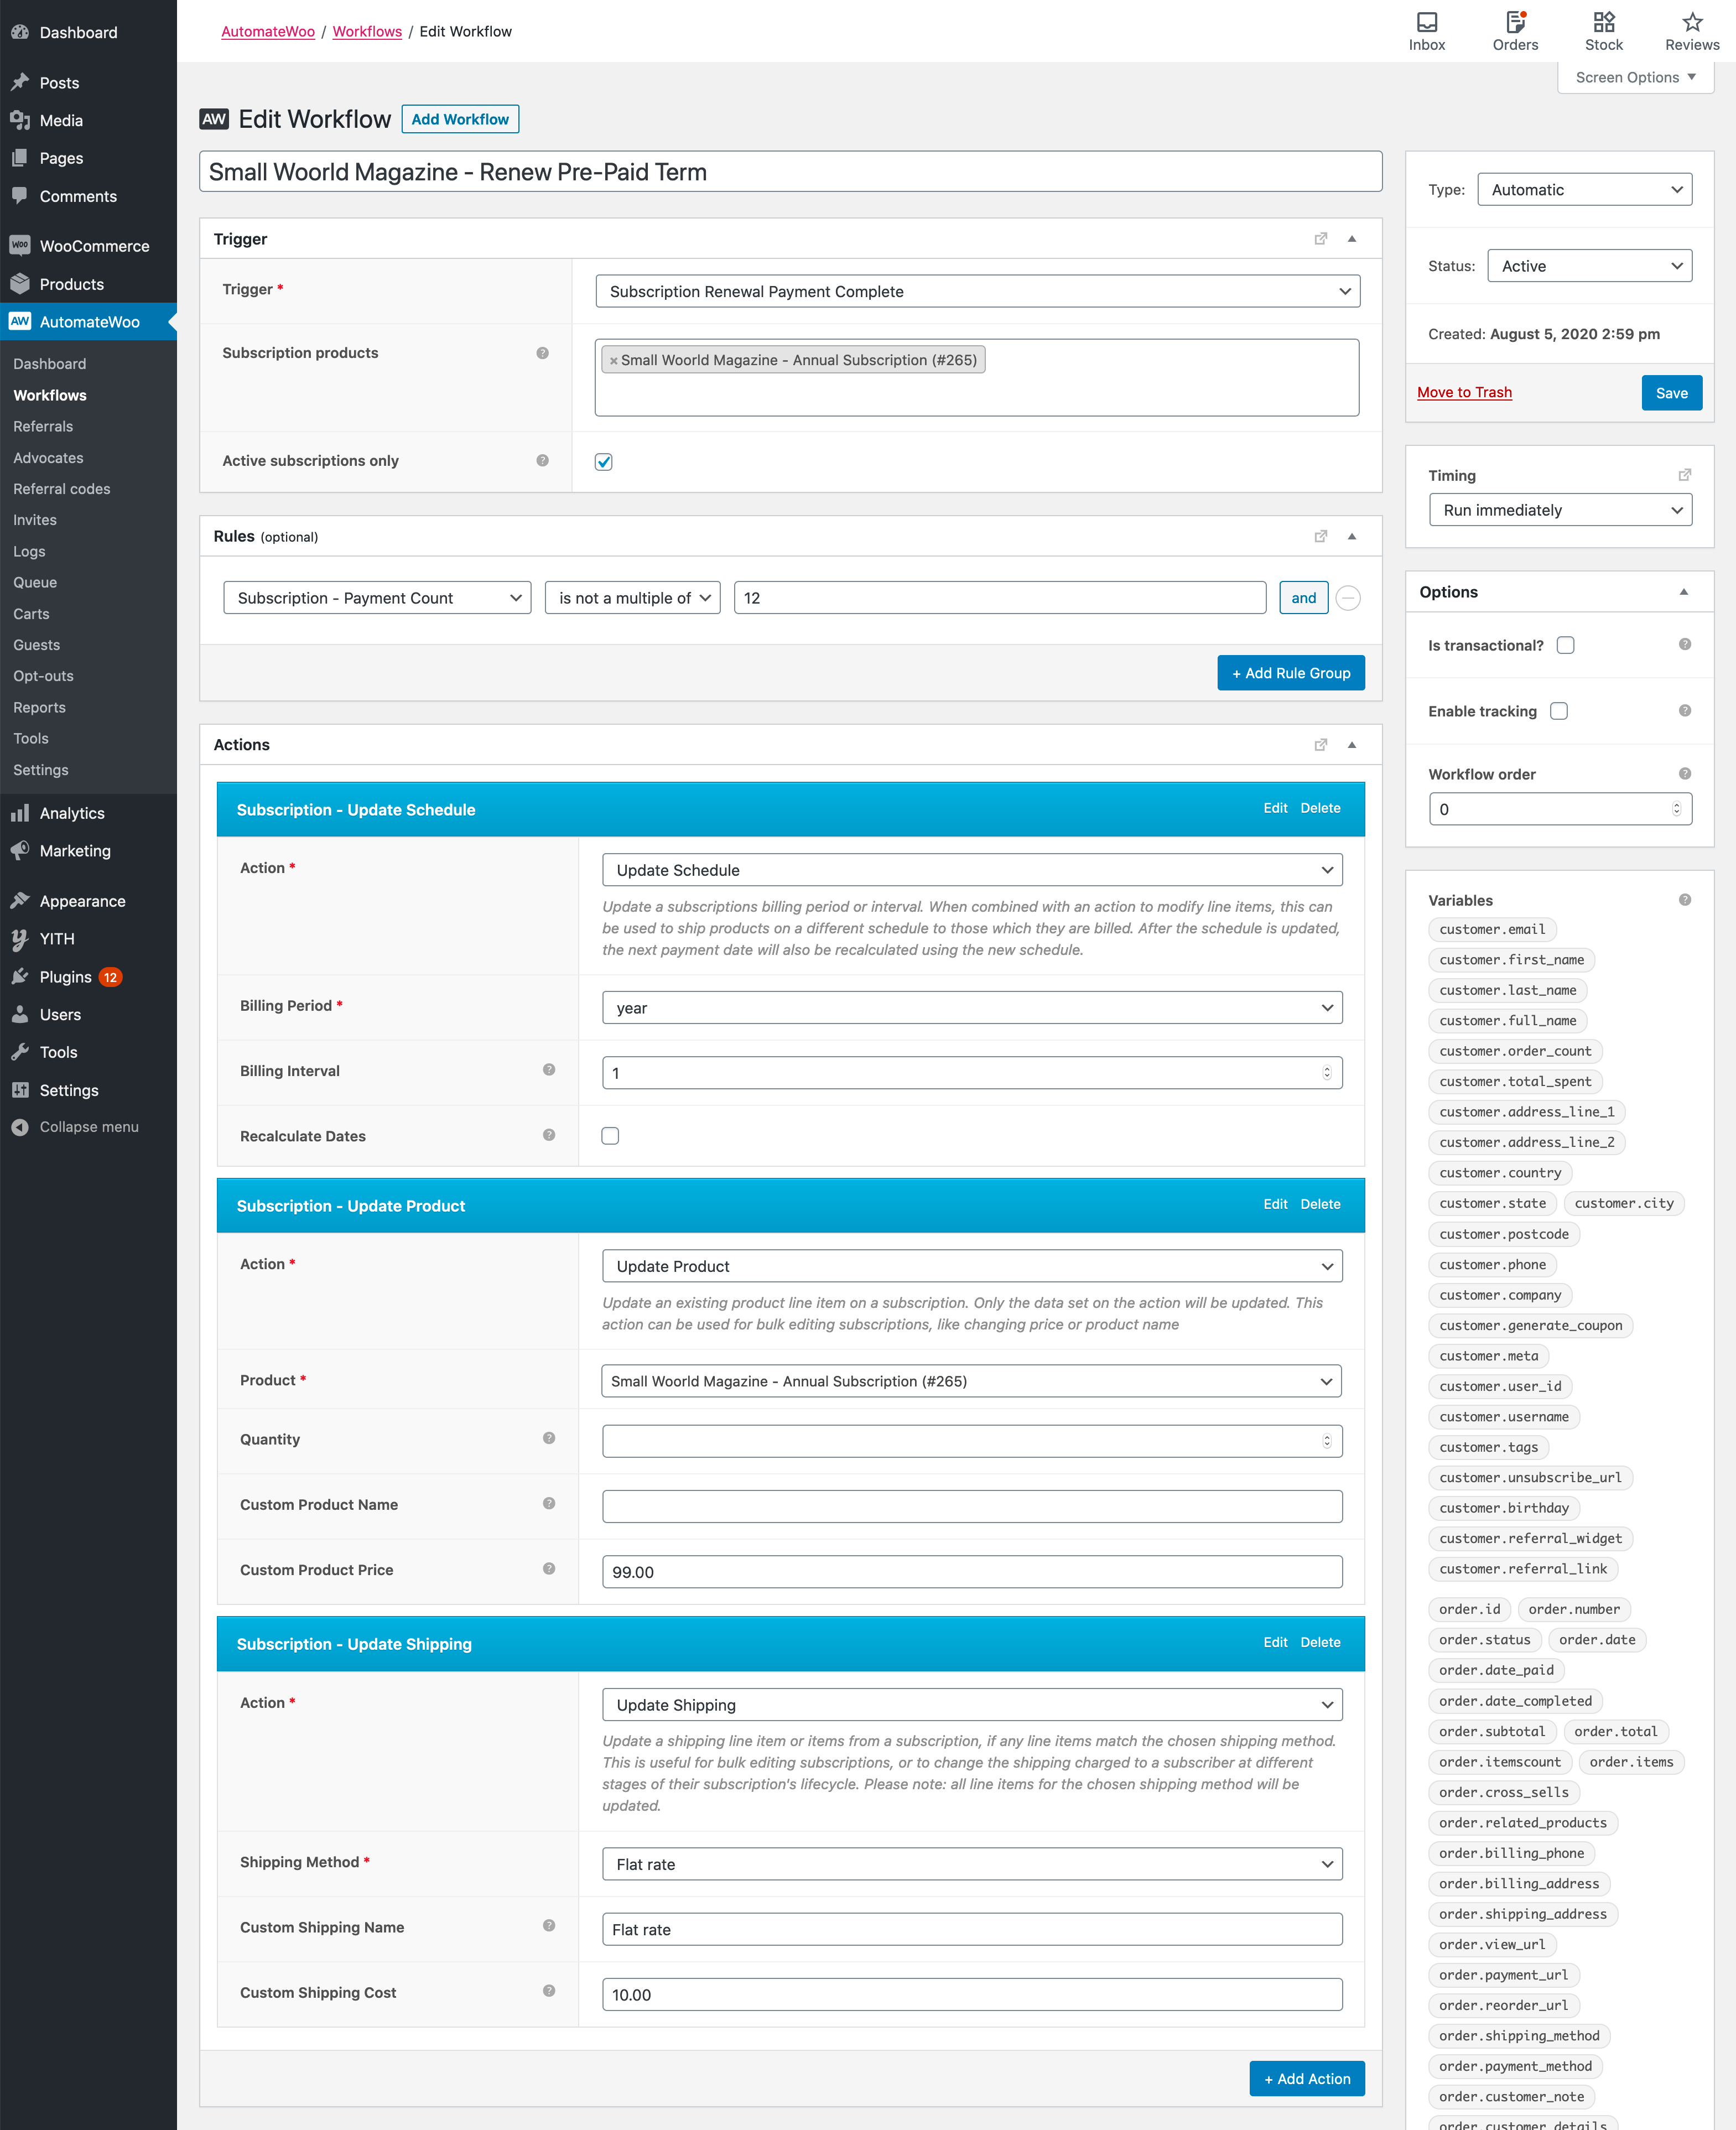
Workflow 2: Renew pre-paid term
↑ Back to topAfter the 12 monthly issues have been shipped, the subscription should process another annual pre-paid amount for the next 12 issues. This requires a new workflow that resets the changes made when starting the pre-paid term. We want this workflow to apply after every 12th renewal order, which can be done using a payment count Rule.
To create the workflow to renew the pre-paid term:
- Go to AutomateWoo > Workflows
- Click Add Workflow
- Enter a Title for the workflow, like Renew Pre-Paid Term
- Select trigger: Subscription Renewal Payment Complete
- Click the Subscription products input
- Enter the name of the annual subscription product created earlier
- Click Add Rule Group
- Select the Subscription – Payment Count rule and choose is a multiple of then enter 12 as the value
- Add action: Subscription – Update Schedule
- Enter the product’s original Billing Interval, which was 1, as it is paid annually
- Enter the product’s original Billing Period, which was year
- Uncheck Recalculate Dates – we want the next payment date to happen in 1 month, not 1 year
- Add action: Subscription – Update Product
- Search for the annual subscription product
- Enter the original product’s price in the Custom Product Price
- Add action: Subscription – Update Shipping
- Select the shipping method offered in your store
- Enter the original shipping cost in the Custom Shipping Cost
- (optional) Enter the original shipping name in the Custom Shipping Name if it was changed in the workflow to start the pre-paid term.
Workflow 3: Resume the pre-paid term
↑ Back to topThe final step is to resume the pre-paid term after it renews. This requires changing the subscription to make sure that no additional amounts will be charged during the pre-paid term and that it will ship monthly again.
To create a workflow to resume the pre-paid term:
- Go to AutomateWoo > Workflows
- Click Add Workflow
- Enter a Title for the workflow, like Resume Pre-Paid Term
- Select trigger: Subscription Renewal Payment Complete
- Click the Subscription products input
- Enter the name of the annual subscription product created earlier
- Click Add Rule Group
- Click Subscription – Payment Count, choose is, then enter 13
- Repeat the previous step for additional multiples of 12 + 1, like 25, 37 and 49.
- Complete steps 7 onwards from the section on creating the Start the pre-paid term workflow to add actions that process free monthly shipments.

Summary of the subscription lifecycle
↑ Back to topWith the above workflows, the subscription lifecycle will be:
- Day 0: Customer purchases the pre-paid subscription product. An initial order records payment for the year’s worth of shipments. The subscription includes the pre-paid subscription product as a line item with a $0 amount set to renew monthly.
- Renewal on month 1 through to month 11: the subscription automatically renews each month. The renewal order includes the pre-paid subscription product as a line item with a $0 amount.
- After the 12th order (11 renewals and the initial order), the subscription’s cost changes to be $99 / year. It continues to have a next renewal date in 1 month.
- Renewal 13: the renewal order includes the pre-paid subscription product with a $99 line total. The subscription’s cost changes to be $0 / month.
The above is just one example of how to set up pre-paid subscriptions with AutomateWoo and WooCommerce Subscriptions. There are many other ways to use the two to create subscription lifecycles suitable for your use case.
For example, instead of shipping monthly, you could ship quarterly or weekly. Instead of annual billing, you could bill quarterly and ship monthly. Instead of using the same product to track shipments, you could add a different product with different SKU for each renewal.
Other Considerations
↑ Back to topShipping Costs
↑ Back to topThere are two options for charging shipping on a pre-paid subscription:
- include Shipping Cost in the product price and provide the customer with free shipping options.
- charge shipping on both the initial order and each shipment.
The above workflow examples charge shipping only once – on the initial sign-up.
AutomateWoo includes actions to add, remove or update the shipping costs on the subscription. This means it is possible to change shipping over the lifecycle of the subscription to suit your requirements.
For example, you can have a shipping line item included on the initial order, then remove that for renewal orders with a $0 product line item cost. Alternatively, you can charge shipping on each renewal order, but not charge for the product.
Subscription Expiration
↑ Back to topAfter a customer’s subscription comes to an end, because the number of pre-paid renewals is reached, the customer can continue the subscription by resubscribing.
To encourage your customers to resubscribe, you can use AutomateWoo’s marketing automation actions, like sending them an email on the Subscription Before End trigger.
Subscription Cancellation
↑ Back to topIf a customer cancels their subscription during the pre-paid term, then no future orders will be created, and the customer will not receive the shipments paid for in advance.
To handle this, we recommend you use AutomateWoo’s marketing automation features to send both you and the customer an email or SMS on the Subscription Status Changed trigger. You can then manually refund the extra pre-paid amount.
Want to refund that amount automatically? Suggest a refund action on the AutomateWoo Ideas board.
You can also disable customer initiated cancellation on these subscriptions using some code provided in the WooCommerce Subscriptions FAQ. If choosing to do this, please be sure there is no law in your local jurisdiction that prohibits such a feature, like California’s subscription cancellation laws.
Subscription Suspension
↑ Back to topWith this workflow applied to a subscription, subscribers and store managers can still suspend the subscription without impacting the number of orders processed for the pre-paid period. The workflows recommended here use the trigger Subscription Renewal Payment Complete and the rule applied is the Subscription – Payment Count. Suspending the subscription will put it in On Hold status, during which time no scheduled renewal payments will be processed.
When the subscriber reactivates the subscription, if the scheduled billing date has passed, WooCommerce Subscriptions will recalculate the next billing date based on the last payment date and then schedule a payment to occur at that time.